Making A Mould
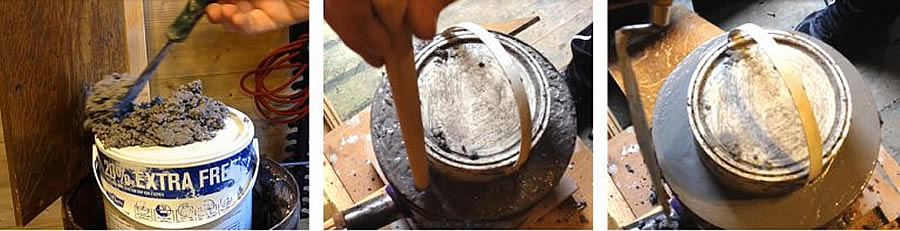
The next morning the base was nice and hard and I was ready to add the sides. An old plastic paint can made an ideal temporary mould liner. It left a good inch and a half to two inch gap all around, which is ideal. The problem was the paint can wobbled slightly, so I obviously didn’t do a brilliant job of flattening the refractory.
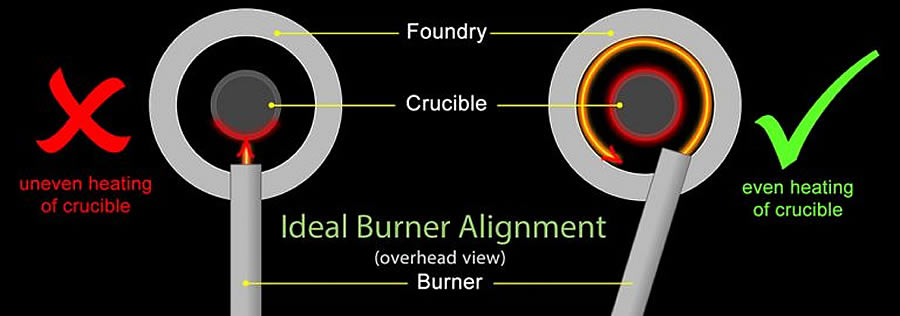
I needed to cut a hole in the plastic paint can to align my waste burner. Adding plenty of temporary weight held the top of the can held securely. As the can was plastic, I decided to cut the hole nice and easily using the steel tube of my oil burner and a blow torch. With careful placement, remembering the ideal alignment of the burner, I heated the tube until it was very hot then pushed it into the plastic can, causing it to melt a hole. With just three or four passes I melted a hole just where I wanted it.
- A plastic pain can makes an ideal interior mould, leaving a 1.5 to 2 inch side gap.
- Cut a hole in the can to align and match with the burner.
- Wrap the end of the burner in cling flim, ideally 1mm or more thick. Alternatively cut the thin metal from a soda can and use this as a sleeve around the pipe - to stop refractory bonding to the steel.
- In a well covered / interior space, insert burner into the can, aligning as if in use.
- Clamp everything in place to resist movement.
Remember the wobbly base? Plasticine (or play doe, modelling clay or whatever you want to call it) comes it really handy here. Rolled into thin sausage shapes, I pressed it around the bottom outer rim of the paint tin then pushed home the can, aligning the burner holes and removing all wobble.
A tiny amount of vegetable oil on a paper tissue rubbed around the paint can should help act as a releasing agent. You don’t need much as all. Just a sheen.
I then wrapped cling film around the tip of the oil burner. Be quite generous here. You want to build up a good millimetre or two in thickness.
Working inside my shed, I pushed the burner through the base and paint can as if it was going to be used, then using clamps I secured everything in place. Any kind of movement needs restricting.
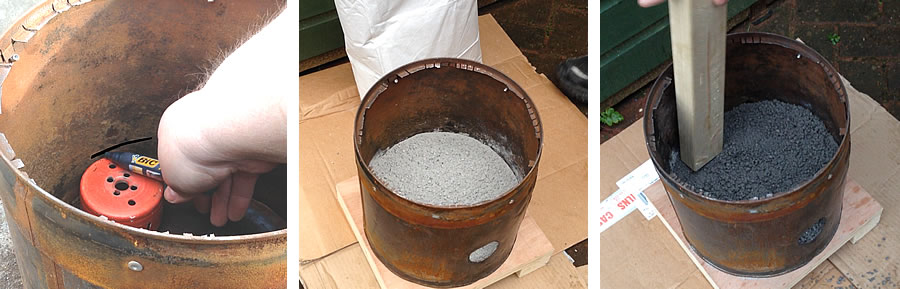
You can see the burner sticking through there at a nice angle. To avoid the refractory getting inside this, I packed plasticine around it. Don’t push too hard or it will poke through the other side. More plasticine was added to the rear of the burner to prevent any refractory escaping. The plasticine stops the paint can wobbling and the refractory getting in, but the filling process could easily dislodge everything. So I added several scoops of dry sand inside the paint can. Its weight held everything firmly.
The lid was placed back on the paint can. You’ll see why in a moment.
Forming The Sides Of The Foundry
Mixing up the refractory again, this mix was a little wetter than last time as it needs to move around more. But still, NOT TOO MUCH. Only enough water to make it move. I’ve seen videos of people making a right mess trying to fill this narrow slot on a foundry. The paint can lid makes this really simple. Using a bit of old board and a scraper, just push the refractory down the slot. Hardly any mess.
- Use plasticine around the burner, inside and out, to prevent refractory seeping through.
- Pour dry sand into the can for added weight and stability then attach the can lid.
- Mix the refractory and little wetter this time and push it down the sides of the can. Pound it well with a stick to remove all air.
- Once full, use a trowel to neaten the top.
Pack the refractory down very well with a stick. Pay particular attention around the burner as you’ll need to refractory to flow under the pipe. This is where the vibration tool works wonders. No matter how much you pack it down with a stick, the vibration seem to make it flow and sink so much more.
This is a wonderful tip from Myfordboy. An ordinary electric sander becomes a fabulous vibrating tool. I attached a piece of copper pipe to mine with a couple of screws. But I found this wasn’t enough. With use the screws worked loose. I added a number of cable ties and this seemed to do the trick.
Eventually the base was filled and this probably uses more refractory than you’d expect. At this point a scrap of wood made an excellent striking off tool to level off the refractory. The reinforced rim certainly came in useful. Don’t rush this stage. Make sure you compact it as well as you can. Work out any air bubbles. Fill any imperfections and tap out the air again. When you’re happy, a light hand and a trowel make a nice job on the surface.
Now you can see the lid. You’ll notice I’ve screwed the handles down. This holds the structure flat against a board preventing any unwanted curving and make things more controllable.
The Foundry Lid
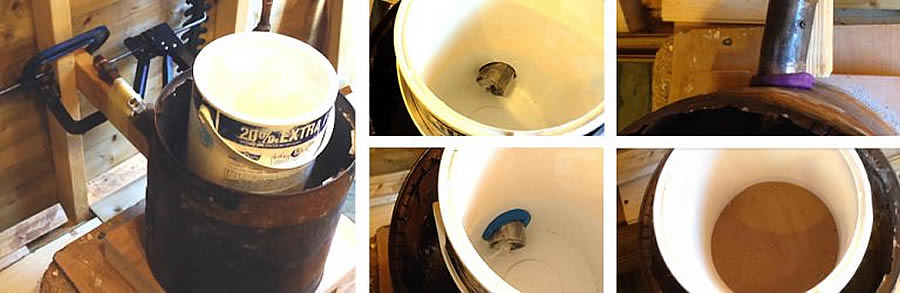
The lid is much the same process but obviously we have a large hole in the centre at the moment. I used a standard food can to line the hole.
- Line the hole in the lid with a food tin.
- Make handles from flattened copper pipe. Attach these to the sides with rivets.
- Fill the lid with refractory and pound it well with a stick to remove all air.
- Once full, use a trowel to neaten the top.
It’s also useful to add handles to the sides of the lid. I took ordinary copper pipe, flattened it, then shaped handles in my vice before riveting these in place. Copper is not the strongest material but it will work well enough in this situation.
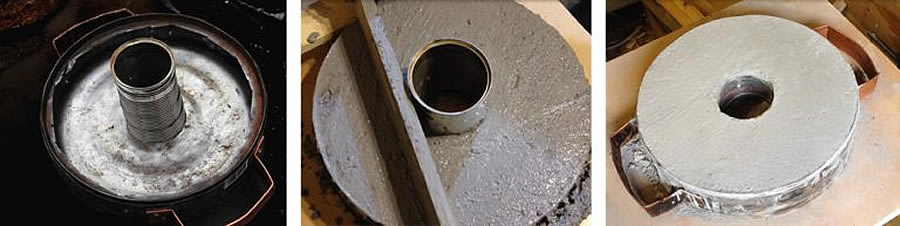
Plasticine can again be used to cover over any potential leak spots and then the lid can be filled in the same way. Now, all we can do is wait for it to dry.
Refractory should be left at least 24 hours in the warm and dry. As this was a weekend project for me it was a week before I was able to tackle taking the moulds out.
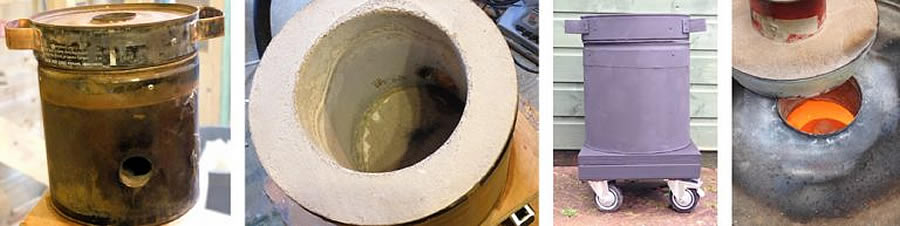
Beginning with the lid, lots of tapping on the food can did nothing so I eventually switched to a pair of pliers and pulled it out. I was very pleased with the results. It was very similar in look and texture to concrete and more than strong enough to put up with my rough handling, though I’d still advise being as careful as possible. It’s pointless damaging all your hard work. There was a little bit of spillage that I’d mopped up at the time and the residue was just a grey powder, easily scraped off.
Moving on to the base, I removed the paint can lid and as much sand as I could. Then I turned on my blow torch to melt the cling film from the burner (be careful with the fumes – I think they’re toxic). Unfortunately I hadn’t added enough cling film and my cunning plan failed. So I tried in vain to remove the burner before giving up and moving on to the plastic can.
Please don’t make the same mistake I did. I had no choice but to smash the can out. Shame really. I think it would have pulled out. The vegetable oil really did seem to do the trick. With a pinching and twisting motion of the pliers it eventually broke up and came free, but I did swear a lot in the process.
An hour or so later of banging the burner with a hammer and squirting it with WD40 finally saw success and the I was able to vacuum away the remain sand and debris.
For the look of the thing, I sanded the entire exterior and sprayed it with heat resistant paint. It looked quite good.
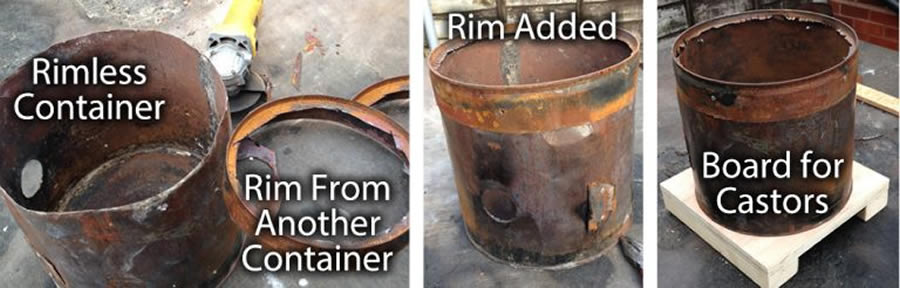
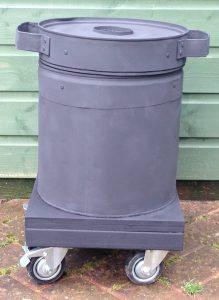
Finally I added four castors (two of them lockable) to make the whole thing mobile.
Priming The Foundry
Purists will tell you it’s necessary to light a few small fires inside a foundry to properly temper and prime it. I’m no expert and didn’t have a clue, so I lit a small wood fire inside and let it burn to nothing. I then took an ordinary bag of self-lighting barbecue charcoal and lit this in the foundry. Again I let it die completely.
- Leave to dry for at least 24 hours before removing all the moulds.
- Light a small wood fire inside the foundry and let to burn out completely.
- Light a small charcoal fire inside the foundry and allow it to burn out completely.
- Sand and paint with heat resistant paint.
That was the total extent of my priming if I’m honest. Whether it helped or not I can’t be sure… but certainly I have no complaints at all about the foundry. It works like a charm.

Recommendation – Before You Begin
One thing I did neglect was Insulation. Plaster foundry’s might fall apart with ease, but the material has excellent insulating qualities. Unfortunately refractory does not. That means if you’re looking for maximum efficiency or if you live in a cooler climate, you will need to think about insulation. In fact as a safety issue I would strongly caution you to insulate beneath your foundry as I didn’t – nearly with disastrous results. Thankfully I did come up with an easy and cheap solution. See my Foundry Plaster Insulation video for details.
If you have any questions for me, please drop me a line.
If you want to see my YouTube video on the subject and see me doing this in real time, simply click below:
 I can still remember being amazed the first time I learned it was possible to melt metals like aluminium, copper and even steel at home to form bespoke metal objects.
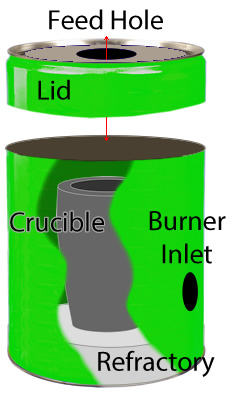 Refractory is material that withstands high temperatures and yet remains stable. Much like cement it can be bought in bags and with the simple addition of water be mixed to form a permanent foundry.