Today I thought I’d share a technique for lost foam casting that I've had good results from in the hope that it may be useful to someone out there. It’s nothing special, more a combination of common practices really.
Lost Foam Casting, if you didn't already know, is the process of melting a foam shape (almost instantaneously) and replacing it with metal replica. Traditionally a foam shape is placed in a container with dry sand, molten metal is poured on - poof - the foam is gone and the metal fills the space where the foam had been.
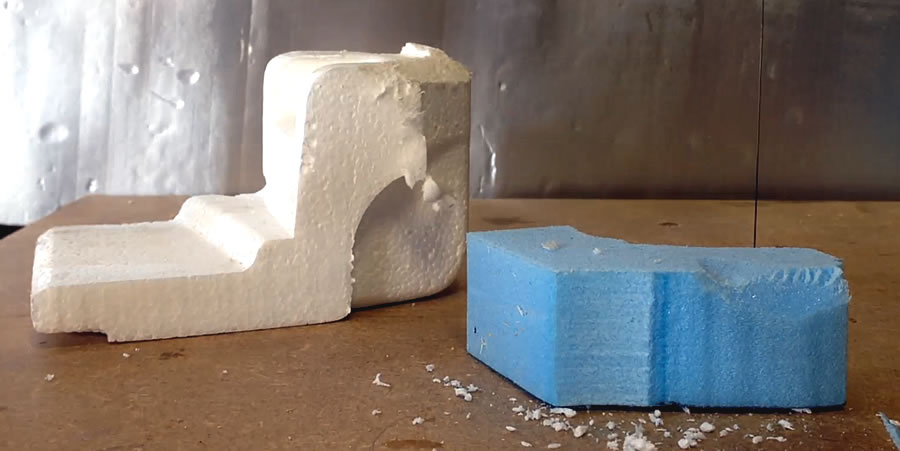
Types Of Foam
Left - Expanded Polystyrene Foam (EPS), commonly used in packaging. Right -
Extruded Polystyrene Foam (XPS)
It begins with the choice of foam. Most folks use Expanded Polystyrene Foam (EPS) when lost foam casting. That’s the sort of foam typically found in packaging. I prefer to use Extruded Polystyrene Foam (XPS), which is a much denser foam much favoured in model making. It has many of the same properties of Expanded foam but for this purpose it has the major advantage of being suitable for tooling.
Take a knife, saw or file to Expanded foam and you'll quickly be covered in tiny white bobbles. The foam crumbles, loses its shape and makes a mess. But Extruded foam can be sawn, cut and sanded. It is a pleasure to work with and whilst not perfectly smooth, it's smooth enough for my purposes.
Extruded foam can be tooled and worked without falling apart, unlike Expanded foam, so if I’m looking for detail, that’s the foam I opt for and that’s what I’m using here. You’ll find it easily enough on the internet or at your local model shop.
Cutting and Sizing
Cutting Extruded (or Expanded) foam with a Hot Wire Foam cutter is a doddle. Extruded foam is usually purchased in blocks of standard thicknesses and a few minutes slicing with a Hot Wire cutter, a sharp knife or even a wood saw will give you the lengths you desire. But what about thickness?
Too Thin
If your foam is too thin, glue another piece to it using Expanding Foam Glue, the sort used in woodwork. Whilst the foam isn't quite the same stuff, it behaves similarly enough in the foundry for our needs. Remember to apply it thinly, spread it well, then weigh the foam down and leave it to dry ideally over night.
Too Thick
If your foam is too thick, you can easily take slices off with a Hot Wire cutter. If you have the patience, you can sand away the excess with ordinary sandpaper. And if you fancy breaking out the power tools, you can even reduce thickness with a Router using a straight cutting bit (I used a bit in my Drill Press). The quality of the cut is determined by the sharpness of the bit, but it will probably still need sanding.
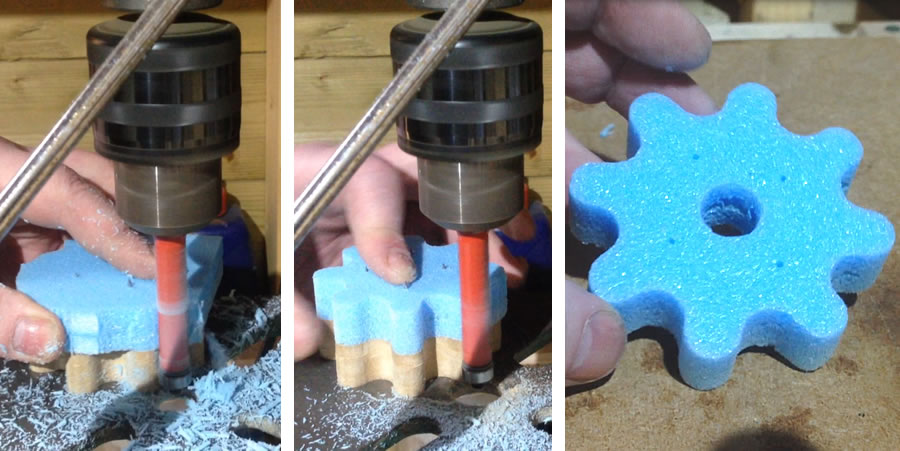
Working From A Template
I previously made some wooden sprockets and I needed to cast these into Aluminum. That meant making a copy out of Extruded foam. Thankfully this isn't too difficult.
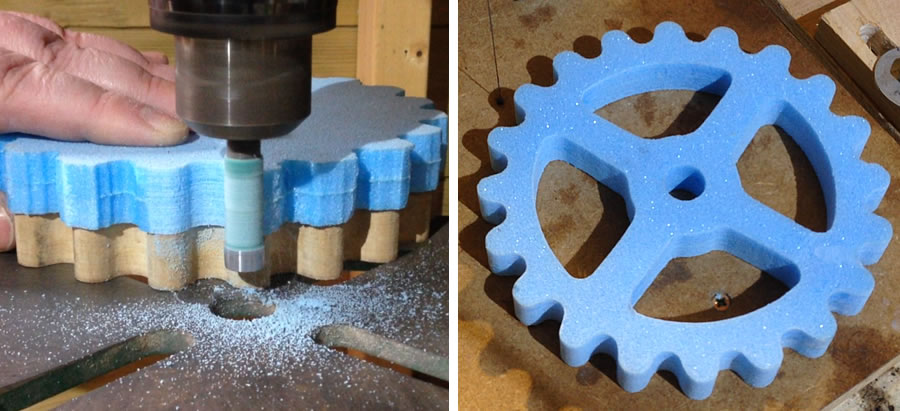
Again a router bit can be useful, particularly a flush trimming bit. Again I used my drill press (mainly because my router had stopped working - thank you DeWalt).
I drilled some fine holes in the wooden sprocket to accept some panel pins. These were hammered through the foam holding it firmly in place. The flush trimming router bit followed the shape of the wooden template, cutting away the excess foam.
The results aren’t too bad and you couldn’t do that with expanded foam. However, it is possible to be neater if you have the patience and if it’s required.
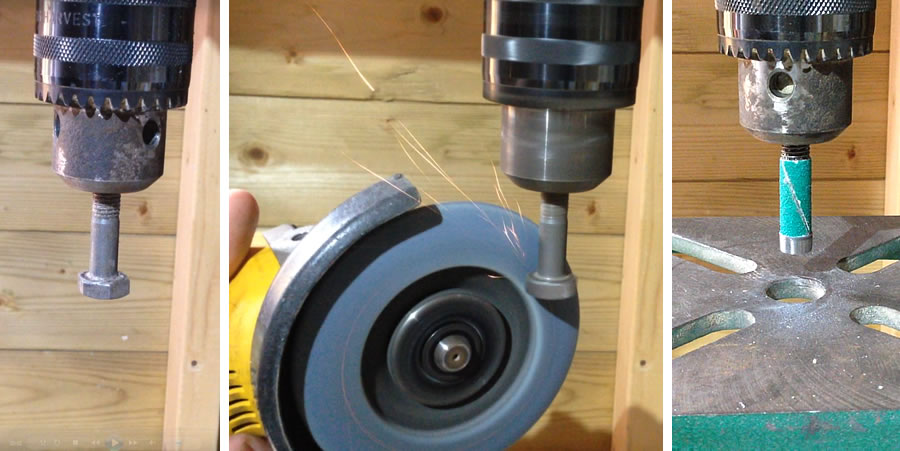
Making A Flush-Sanding Drum
Using an ordinary steel bolt, I made a crude but effective flush sanding drum. I placed the bolt in my drill press, turned it on and got to work with the angle grinder.
The idea is to round the head of the bolt and reduce it in size until it’s just a little wider than the shaft. I then cut some coarse sand paper glued this to the shaft of the bolt.
Used once again in the drill press, it's a very effective flush-sander. I simply cut away the bulk of the material with the hot wire cutter, then I gradually sanded away the remaining excess foam. A blast of air prevents the sand paper from clogging and it lasts for ages as the sandpaper isn't really working all that hard.
Holding A Candle To Imperfections
If there are any imperfections you can drip candle wax into them. Build this up, repeating the dripping process several times if necessary, allowing thick wax to cool, then shape it with a sharp blade or sand paper. Wax will vanish easily in the foundry just like the foam.
Sprues
There's lots of wonderful terminology in casting, like gates, feeders, risers, runners, etc. I'm not a professional so I'll make life easy for me (and hopefully you) by just sticking with 'sprues.' As I understand it a sprue is a channel through which molten metal is poured into a mould. Traditionally in lost foam casting, the sprues are made from foam, but prefer to minimise the amount of foam in my sprues, leaving instead just empty space wherever possible. Why? Well if you've ever performed a lost foam cast, as you pour there's always what seems a few seconds delay - as the foam evaporates and gas escapes - before the molten metal sinks in. My logic (which could be flawed) is that the longer it takes to get the metal into the mould, the more likely it is for the metal to harden and spoil the finish.
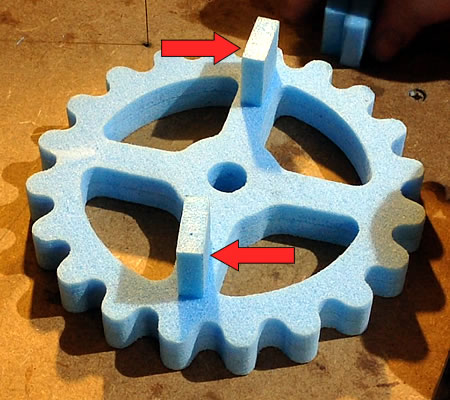
As such I try to built my sprues in sections. I begin with gluing on a couple of small tabs somewhere on the work that I can later cut away with ease... like this:
A couple of small foam tabs are glued on to begin the sprues
One of these sprues will be the feed, where I pour in the metal, the other will be a vent. The vent may well not be necessary but I prefer to include it. The idea is to relieve air pressure and also make an easy location for gases to escape.
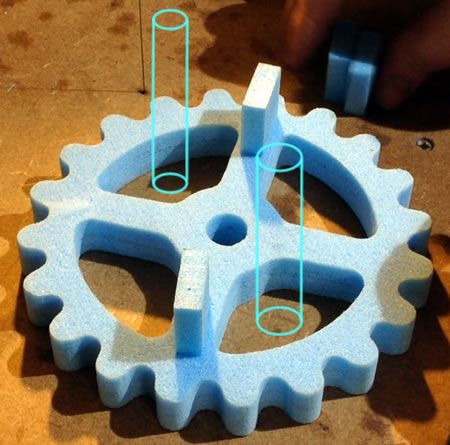
The next stage is to incorporate two columns of air like this:
Two columns of air form the majority of the sprues, one being a vent and one a feed
Notice that these are positioned within voids in the foam sprocket. They could be (and probably normally are) positioned outside of the pattern.
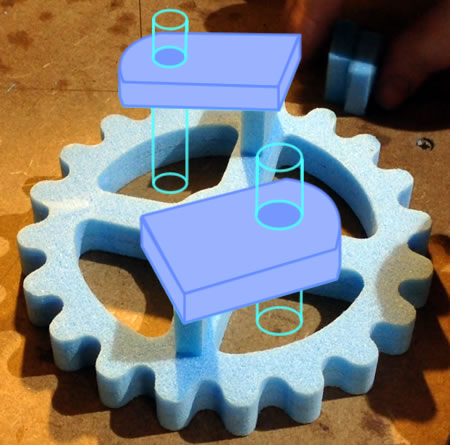
To connect these columns of air to the sprue stubs, foam can be cut and shaped like this:
Two pieces of foam can be cut to connect the columns with the stubs
If this is all sounding a bit strange, to make the columns of air I used ordinary household copper piping. I pushed the pipe through scraps of foam, cutting neat holes, then roughly shaped the remainder of the foam with the hot wire cutter. Neatness doesn't really matter for these. And if you're still confused, don't worry. It should make sense when we get on to the sand.
Green Sand
Generally in lost foam casting, dry sand is used. I prefer to use what's known as Green Sand. Whilst this can have a green tinge, it rarely does. It's simply fine, soft sand that contains Bentonite clay. This makes it very pliable and apt to hold its shape when damp (not wet... damp). It's a bit like building sand castles on the beech. Green sand could make fantastic castles and hold all manner of detail until it dried and fell apart.
Flasks
In casting, a flask is a frame that holds the sand. There's usually two halves and each has just four sides, so no top or bottom. You'd expect the sand would fall out and sometimes it can. But if the green sand is compacted properly, it will maintain its shape and stay within the flask.
With that said, here I poke a finger in the eye of convention by having a bottom on my flask.
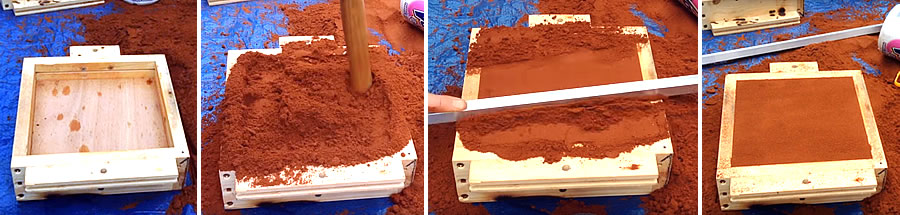
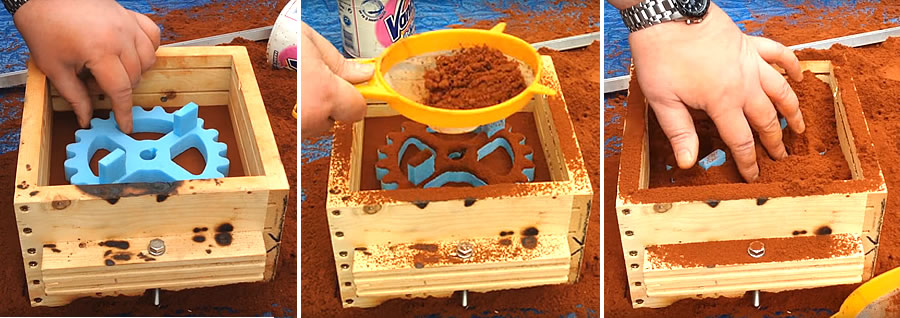
This is packed with green sand. The sand is rammed (squashed) repeatedly into the bottom flask, filling, pounding, filling, pounding, etc, until eventually the top is scraped away to leave a smooth flat surface. You don't have to beat frantically, by the way, just enough to squash the sand. It's actually bad practice to overly compress green sand, so a firm rather than frenzied approach is best.
(1) Empty bottom flask. (2) Green sand is repeatedly rammed into the flask. (3) A flat edge is pushed and scraped across the top to form (4) a flat finish.
The top flask is then bolted in place and the foam sprocket is positioned with the tabs upwards. Sand is then sieved onto this so that the finest of the sand makes contact with the foam. More sand is added and pushed carefully into all the voids. Fingers are the best tool here as it's necessary to avoid damaging the foam pattern.
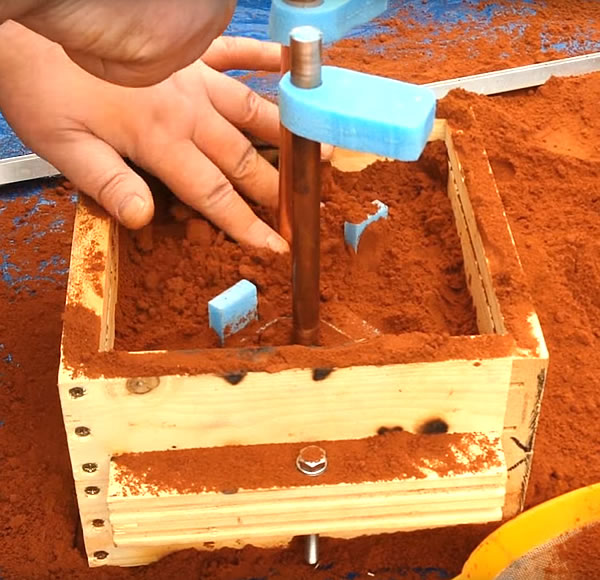
Once the sprocket is best part covered BUT you are still able to make out its shape, it's time to add the copper pipes. Remember to place these in a void area and tap them in lightly with a hammer. You'll see the pipes already have the sprue foam pieces slid on to them. It should be a nice tight fit.
The pipes aren't very stable just yet so more sand needs to be added. Make sure there are no air pockets and don't crush the foam whilst repeating this process until the sand is level with the tops of the sprue tabs.
(1) The sand is filled level with the sprue tabs.. (2) A little glue can be added to the tabs then the foam sprues pushed down. (3) More sand is added
Ideally at this point you want the sand to be fairly flat and well pressed down. I applied a little expanding foam glue to the top of these, though it’s not strictly necessary, then I slid the other section of the sprues down the pipes to contact the glue.
Confession Time
I must confess I cocked up big time at this point. Whilst everything I've described to you is good form, I made the mistake of using a flask that was too shallow. There simply wasn't enough sand on top of the highest point.
It's important the foam is well buried. I'd recommend at least a good couple of inches on top of your highest foam point. I didn't do this and my pour could have ended in disaster. So please, for your own sake, learn from my mistake here. If it helps, watch the video through and see how close I came to standing in molten aluminum... not a good idea.
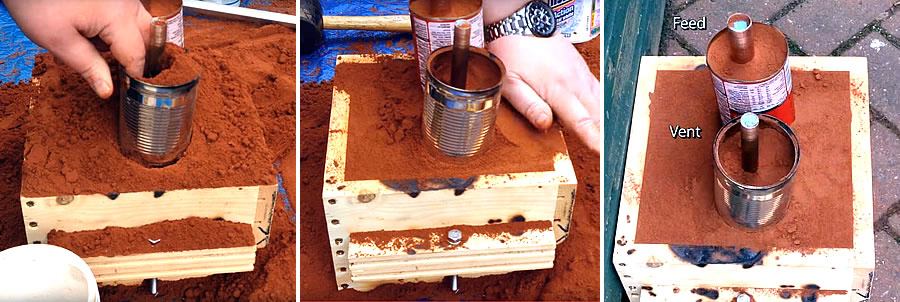
Extending The Feed
I picked up a tip from Myfordboy (look him up on YouTube - well worth while) to extend the height of the feed and the vent. I used empty food tins for this, with the tops and bottoms cut away. These are placed around the pipes and packed full of sand.
(1) Empty food tins are placed around the pipes and filled with sand. (2) Everything gets packed down well. (3) Almost ready for he pour.
The idea of extending the feed is to increase the pressure of the metal flowing into the mould. I have to admit, I buy into the theory, though again you might see others do things differently.
If you've got good eyes, you may also notice that my feed and vent pipes are different sizes. Again this is just a personal preference.
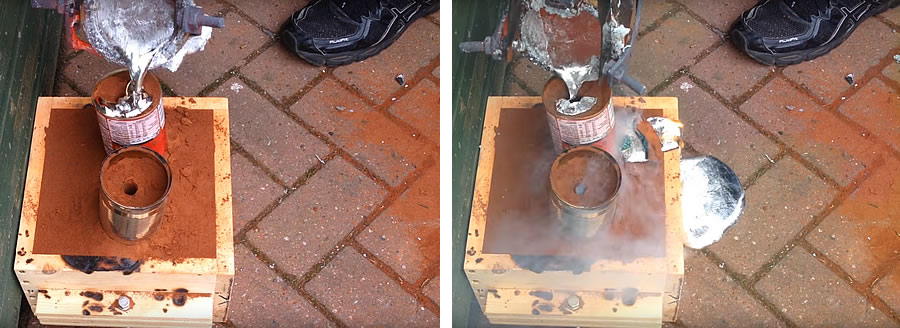
Just Before The Pour - Pull The Pipes
When my foundry had melted some aluminum, I added some flux and scrapped away the dross ready to pour. It was then time to pull the pipes from the sand. This is done carefully with a twisting motion and the sand is repeatedly pushed down into the tins, particularly around the feed pipe where it's ideal to shape the sand into a funnel, encouraging everything the flow inwards.
The Pour
Moving swiftly but carefully, I pulled my crucible from my foundry and poured the molten metal into the feed pipe.
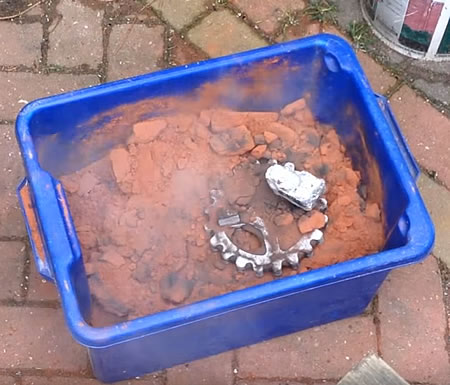
As expected, the metal headed down smoothly, evaporated the foam sprues, evaporated the remaining foam and started to fill the void left behind. Unfortunately in my case, there was not enough sand to hold back the pressure of the pour and molten metal burst from the flask.
I may make light of the situation but it is a very dangerous predicament. Please learn from my mistake.
I actually thought this pour a failure and threw aside my flask and banged out the content grumbling about my own stupidity. But then I spied a hopeful something inside the sand. I poked at it with the handle of my rubber mallet and was amazed to see a fully formed sprocket. Even though I completely cocked things up, the process is forgiving enough to still work. So far this technique has worked for me every time.
Clean Up
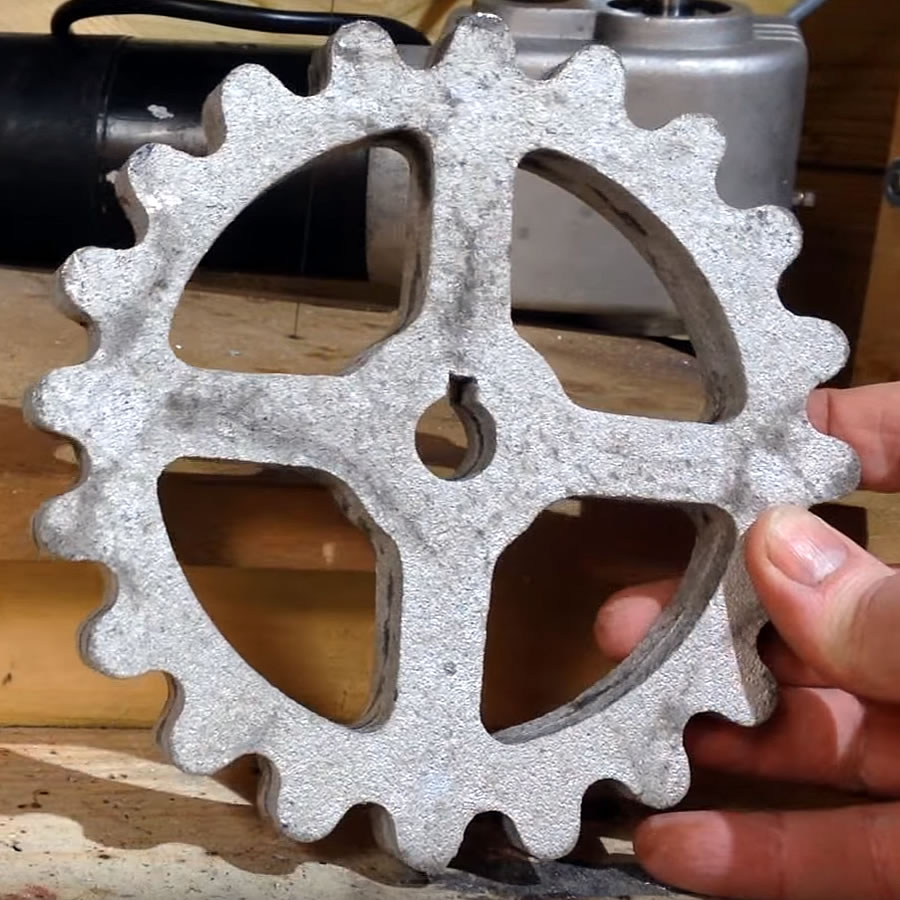
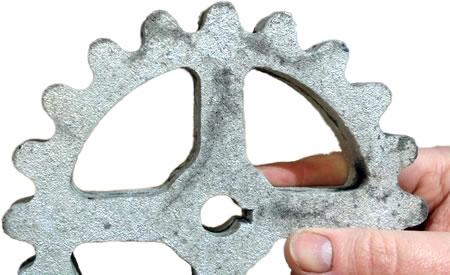
Once everything had cooled and back inside my shed, I was able to cut away the sprues and tidy up the sprocket with my angle grinder and some coarse sand paper.
You can clearly see the pattern of the Extrude foam which could also be filed away if required.
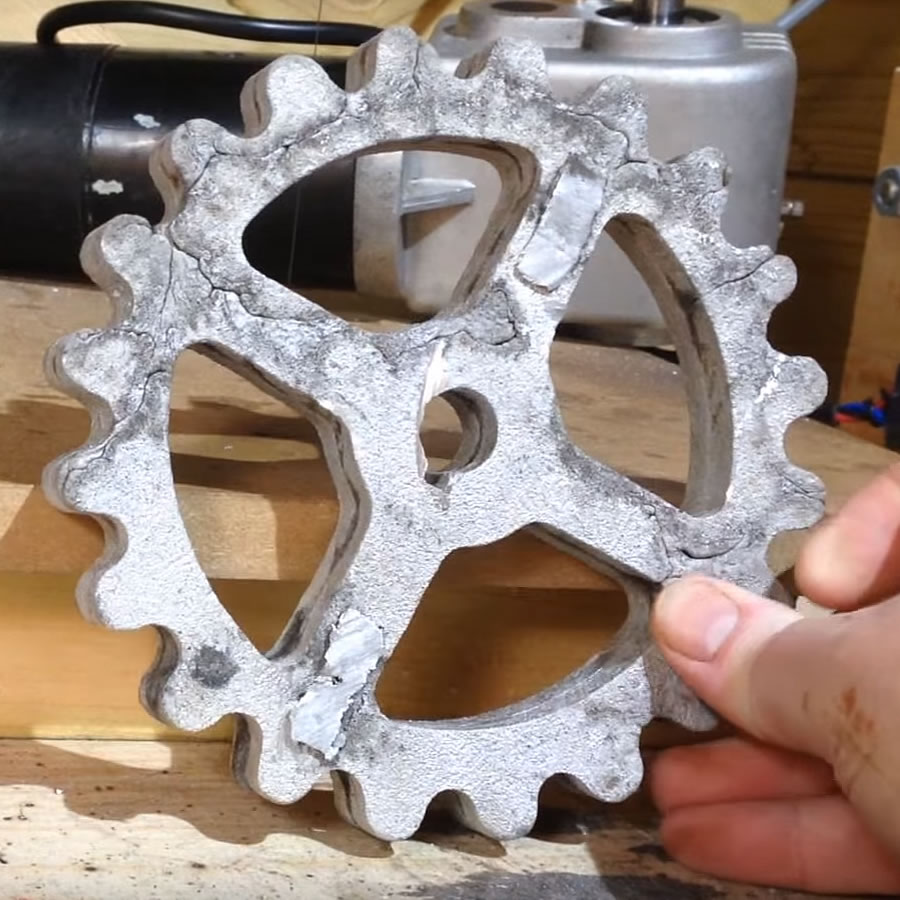
The other side, which was the top, was not quite as good. There were imperfections that looked like cracks but I think were surface only, caused by the pour spilling out of the flask and there not being enough head pressure to push the molten metal fully to the sand. I don’t believe there’s any structural weakness, at least not enough for my purposes, and I could possibly grind away these cracks or maybe even fill them.
So if you do as I say rather than as I did folks, I’m hoping this lost foam method of mine may help some people out there. Despite the evidence of the last image, it has actually been a very successful technique for me. Even when it's gone wrong, as it did here, it still went right, and I put that down to the combination of Extruded foam and green sand.
Improvements and Refinements
If you've enjoyed this topic, I'd recommend you look at my latest Lost Foam Casting video. I spent a couple of months experimenting, researching and exchanging ideas with a casting expert and came up with a few things I'm rather pleased with.
“For it is in giving that we receive” - Saint Francis of Assisi
If you'd like to offer a donation (and help me fund a few new projects), then please click the donate button below. Payments are handled securely by PayPal. For more information on why I have this button, click here.
Or... Become A Patron
Alternatively, if you can spare a little each month, consider becoming a Patron. Patron's make it possible for me to continue developing my YouTube Channel and my websites. Please CLICK HERE for more information.
 Today I thought I’d share a technique for lost foam casting that I've had good results from in the hope that it may be useful to someone out there. It’s nothing special, more a combination of common practices really.